Battery switch on travel trailer function is crucial for managing your RV’s power. Understanding how to use your battery switch—whether it’s a simple 1-2-both-off model or a more complex setup—is key to avoiding electrical issues and maximizing your battery life. This guide breaks down the functionality, safety procedures, troubleshooting tips, and maintenance needs, helping you become a battery-managing pro.
We’ll cover everything from the different types of switches available and how to safely connect and disconnect your batteries, to diagnosing problems and performing routine maintenance. By the end, you’ll confidently manage your travel trailer’s power system and extend the life of your batteries.
Connecting and Disconnecting Batteries: Battery Switch On Travel Trailer Function
Properly connecting and disconnecting your travel trailer’s batteries is crucial for safety and maintaining the longevity of your battery system. A battery switch simplifies this process, allowing you to easily switch between batteries or disconnect them completely. This section details the safe procedures and important safety considerations.
Safe Battery Connection and Disconnection Procedure
Before beginning any work on your battery system, always ensure the battery switch is in the “OFF” position. This prevents accidental short circuits and protects you from electrical shock. Wear safety glasses to protect your eyes from potential splashes of battery acid. Have a pair of insulated gloves handy to protect your hands.
- Locate the Battery Switch: Find the battery switch, usually located near the batteries themselves or in a convenient access panel.
- Verify the Switch is OFF: Double-check that the battery switch is in the “OFF” position. This is the most important safety step.
- Connect the Batteries (if necessary): If connecting batteries, carefully attach the positive (+) cables first, then the negative (-) cables. Ensure all connections are secure and tight. Use a wrench if necessary to tighten the terminals.
- Switch to the Desired Battery Bank: Once the batteries are connected, use the battery switch to select the desired battery bank (e.g., “Battery 1,” “Battery 2,” or “Both”).
- Disconnect the Batteries: To disconnect, first turn the battery switch to the “OFF” position. Then, carefully disconnect the negative (-) cables first, followed by the positive (+) cables. This prevents sparks and reduces the risk of short circuits.
Safety Precautions for Working with Batteries
Working with batteries involves inherent risks. Always prioritize safety by following these precautions:
- Never work on batteries in a confined space with poor ventilation. Battery fumes are hazardous.
- Always wear safety glasses and insulated gloves. This protects against acid splashes and electrical shock.
- Avoid contact with battery acid. If acid spills, immediately neutralize it with baking soda and water. Rinse the affected area thoroughly.
- Never short-circuit the battery terminals. This can cause a fire or explosion.
- Keep children and pets away from the battery area. Batteries pose a significant danger to them.
Importance of Proper Grounding
Proper grounding is essential for the safe and efficient operation of your battery system. A properly grounded system prevents stray electrical currents and protects against electrical shock. Grounding typically involves connecting the negative (-) battery terminal to a clean, bare metal part of the trailer’s chassis. This provides a safe path for any stray electrical current to flow to the ground, preventing damage to the electrical system and protecting you from harm.
So, you’re hitting the road in your travel trailer? Awesome! First things first: learn how to properly use that battery switch. Check out this guide on the battery switch on travel trailer function to avoid any dead-battery surprises. Once you’ve got the power sorted, it’s time to focus on the entertainment! Setting up an amazing audiophile travel setup can seriously elevate your trip, ensuring you enjoy your favorite tunes wherever your adventures take you.
It’s all about maximizing your enjoyment, right?
A poorly grounded system can lead to erratic electrical behavior, corrosion, and increased risk of fire.
Battery Switch Operation Flowchart
Imagine a flowchart with three main boxes: Box 1: “Battery Switch OFF?” This box has a “Yes” path leading to Box 2 and a “No” path leading back to itself with a warning: “Turn switch OFF before proceeding.” Box 2: “Connecting/Disconnecting Batteries?” This box branches into two paths:* “Connecting”: This path leads to a sequence of actions: “Connect Positive (+)”, “Connect Negative (-)”, “Turn switch ON to desired position.”
So, you’re prepping for a road trip? Awesome! First things first: make sure you understand your travel trailer’s power system. Check out this guide on the battery switch on travel trailer function to avoid any dead-battery surprises. Once you’ve got that sorted, think about your entertainment; a killer audiophile travel setup can seriously elevate the whole experience.
Properly managing your power and sound will make your trip much smoother and more enjoyable!
“Disconnecting”
This path leads to a sequence of actions: “Turn switch OFF”, “Disconnect Negative (-)”, “Disconnect Positive (+)”. Box 3: “Complete.” This is the final box indicating the procedure is finished. All paths from Box 2 eventually lead to Box 3.
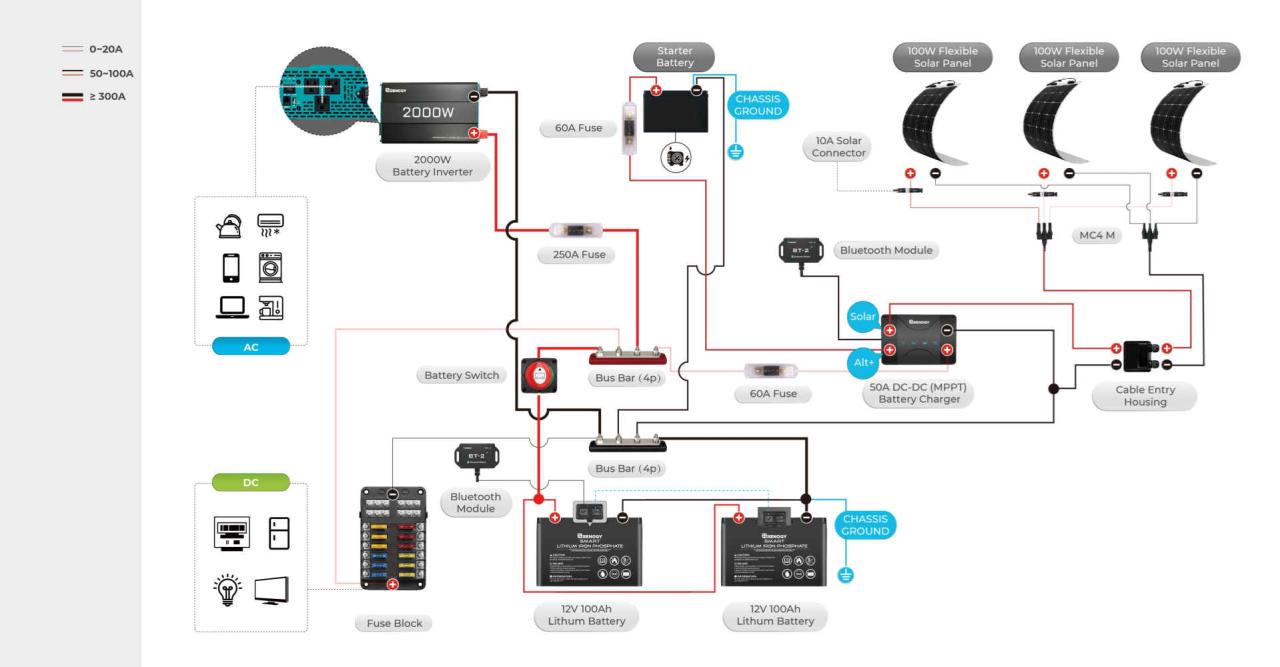
Battery Switch and Charging Systems
Understanding how your battery switch interacts with your travel trailer’s charging system is crucial for maintaining your batteries and ensuring you have power when you need it. This section will explain how the switch affects charging from different sources and highlight the differences in charging various battery types.The battery switch acts as a gatekeeper, controlling the flow of electricity to and from your batteries.
When connected to shore power (plugged into a campsite’s electrical hookup), the converter charges your batteries. The battery switch determines which battery bank (or both, depending on the switch type) receives this charge. Similarly, when driving, the alternator charges the batteries through the truck’s charging system; again, the battery switch dictates which battery bank(s) are charged. Incorrect switch settings can prevent charging or lead to uneven charging between batteries.
Battery Switch Impact on Charging, Battery switch on travel trailer function
The position of your battery switch directly influences which battery bank(s) receive a charge from either shore power or the vehicle’s alternator. A typical three-position switch allows for charging one battery bank, the other, or both simultaneously. If only one bank is selected, the charging current is dedicated to that bank, resulting in faster charging for that specific bank.
Selecting both banks distributes the charging current, potentially resulting in slower charging for each individual bank. This is particularly important to remember with smaller charging systems, as the current is split. For example, a 50-amp shore power system charging two 100Ah batteries will charge each battery at a slower rate compared to charging only one 100Ah battery.
Charging Characteristics of Different Battery Types
Lead-acid and lithium batteries have significantly different charging characteristics. Lead-acid batteries are more tolerant of overcharging (to a degree), but require a slower charging rate to prevent damage. Lithium batteries, on the other hand, are more sensitive to overcharging and require a specific charging profile, often using a multi-stage process involving bulk charging, absorption charging, and float charging. Using the wrong charging method can significantly reduce the lifespan of lithium batteries, even leading to catastrophic failure.
It’s vital to use a charger specifically designed for the type of battery you have installed. For instance, a lead-acid charger will likely damage a lithium battery, whereas a lithium charger can safely charge a lead-acid battery but won’t optimize its charging process.
Proper Battery Charging Using the Battery Switch and Charging System
Before connecting to shore power or starting your vehicle, ensure the battery switch is in the correct position to charge the desired battery bank(s). Consult your travel trailer’s manual and battery charger’s instructions for specific charging recommendations. Regularly monitor your battery voltage to ensure proper charging. If using a lithium battery system, a battery monitoring system with alerts for over-voltage or under-voltage is highly recommended.
For lead-acid batteries, periodic visual inspection for signs of damage or corrosion is important. For both types, following manufacturer guidelines for charging and maintenance is crucial to maximize their lifespan and performance.
Battery Switch Maintenance and Replacement
Keeping your travel trailer’s battery switch in top condition is crucial for reliable power. Regular maintenance prevents problems and ensures your batteries are always ready when you need them. Neglecting this simple task could lead to frustrating breakdowns and costly repairs down the road. This section covers a recommended maintenance schedule, cleaning tips, and the process of replacing a faulty switch.
Regular Maintenance Schedule
A proactive approach to battery switch maintenance is key. Aim to inspect your battery switch and connections at least twice a year, ideally before and after the main camping season. This allows you to catch any issues early before they escalate. More frequent inspections are recommended if you use your trailer extensively or in harsh weather conditions. For example, if you’re a full-time RVer, monthly checks are a good idea.
This regular schedule helps ensure consistent power and prevents potential battery-related problems.
Cleaning and Inspecting the Battery Switch and Terminals
Cleaning your battery switch and terminals is straightforward but vital. Begin by disconnecting the batteries to prevent accidental shorts. Use a wire brush or sandpaper to clean any corrosion or build-up from the terminals and the switch itself. Pay close attention to the connection points; even a small amount of corrosion can significantly impede current flow. After cleaning, apply a corrosion inhibitor, such as dielectric grease, to protect the terminals and prevent future corrosion.
Visually inspect the switch for any signs of damage, such as cracks, loose components, or overheating.
Replacing a Faulty Battery Switch
If your battery switch is malfunctioning—for example, if it fails to make a solid connection or shows signs of significant damage—replacement is necessary. First, disconnect the batteries completely. Then, carefully remove the wires from the old switch, noting their positions to ensure correct reconnection. This is important to avoid damaging your batteries or electrical system. Once the old switch is removed, install the new switch, ensuring all connections are secure and properly tightened.
Reconnect the batteries and test the switch functionality to verify proper operation. Remember to always consult your trailer’s wiring diagram for accurate connection details.
Tools and Materials for Battery Switch Maintenance and Replacement
Having the right tools makes maintenance and replacement easier and safer. You’ll need:
- Wire brush or sandpaper
- Dielectric grease
- Screwdrivers (appropriate size for your switch)
- Wrench (if necessary for terminal connections)
- Replacement battery switch (if needed)
- Voltage meter (for testing)
- Safety glasses
- Gloves
These tools will help you to efficiently and safely maintain and replace your battery switch. Remember safety first – always disconnect the batteries before starting any work.
Visual Representation of Battery Switch Components
Understanding the physical characteristics of your travel trailer’s battery switch is crucial for safe and effective operation. This section provides a detailed description of a typical battery switch, its location, and its constituent parts. Think of this as a visual guide to help you confidently identify and maintain your system.A typical battery switch for a travel trailer is usually a fairly robust piece of equipment, about the size of a large fist (roughly 4-6 inches square) and roughly 2-3 inches deep.
It’s typically made of heavy-duty plastic or metal, designed to withstand the vibrations and potential moisture exposure found in a travel trailer environment. The shape is generally rectangular or square, with clearly labeled terminals and switches. The labeling will usually indicate which terminals connect to the batteries (often labeled “Battery 1” and “Battery 2,” or similar), the charging system (often labeled “Charge”), and the load (the trailer’s electrical system, usually labeled “Load” or similar).
Some switches may also include a separate ground terminal.
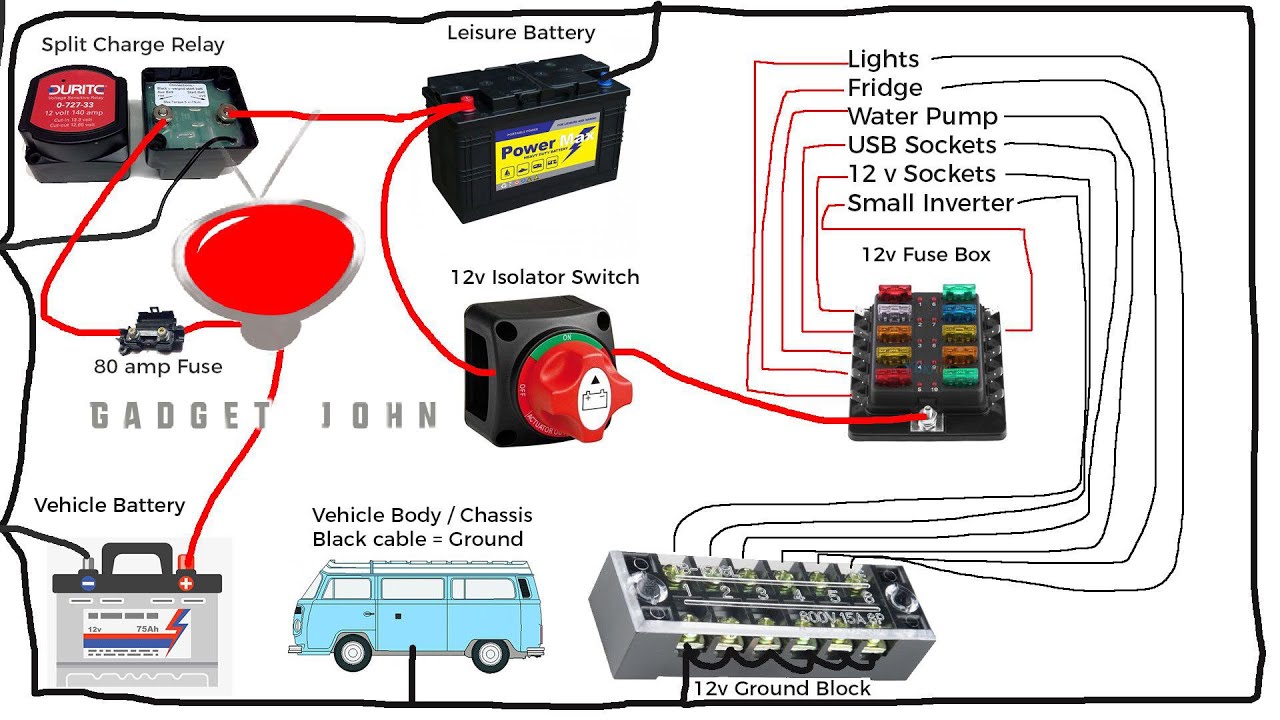
Battery Switch Location and Connections
The battery switch is usually located in a readily accessible location near the batteries themselves, often in a compartment designed for battery storage. This placement minimizes the length of the heavy-gauge wiring needed to connect to the batteries, reducing voltage drop and improving efficiency. The switch is typically mounted securely to a surface, either with screws or bolts, to prevent movement during travel.
Thick, heavy-duty cables connect the switch to the batteries’ positive terminals. A similar cable connects the switch to the positive terminal of the charging system. Another heavy-duty cable runs from the switch to the positive side of the trailer’s electrical system. Finally, a ground wire connects the switch to the trailer’s ground system.
Battery Switch Components
The battery switch itself consists of several key components. First, there are the terminals – large, sturdy metal posts or clamps where the heavy-gauge cables connect. These terminals are often clearly marked with their respective functions (Battery 1, Battery 2, Charge, Load, Ground). Next, there are the switches themselves. These are typically robust toggle switches or rotary switches that allow you to select which circuits are connected.
A common configuration is a three-position switch: “Off,” “Battery 1,” and “Both.” “Off” disconnects everything, “Battery 1” connects only the first battery to the load, and “Both” connects both batteries to the load. Finally, many battery switches include indicator lights or other visual cues to confirm the current switch position. These lights might illuminate when a particular circuit is active, providing visual confirmation of the switch setting.
Some switches might even include a small fuse or circuit breaker as an added safety feature. The whole assembly is usually enclosed in a weather-resistant housing.
Mastering your travel trailer’s battery switch is about more than just flipping a switch; it’s about ensuring safe and reliable power for your adventures. By understanding the functionality, performing regular maintenance, and knowing how to troubleshoot common problems, you can keep your RV running smoothly and avoid costly repairs. So, get out there and enjoy the open road, knowing you’re in control of your power!
Popular Questions
What happens if I leave my battery switch in the “off” position for an extended period?
Leaving the switch off completely disconnects your house batteries from the trailer’s electrical system, preventing parasitic drain. This is generally safe, but you won’t be able to use any 12V appliances.
Can I use a different type of battery with my current battery switch?
The compatibility depends on the amperage and voltage. Check your switch’s rating and your battery’s specifications to ensure they’re compatible. Using an incompatible battery can damage your switch or the battery.
My battery switch feels hot. Is this normal?
A slightly warm switch is usually okay, but excessive heat indicates a problem. Check for loose connections, corroded terminals, or a faulty switch. If it’s hot to the touch, turn it off immediately and investigate.
How often should I clean my battery terminals and switch?
Clean your battery terminals and switch at least twice a year, or more frequently if you notice corrosion. This helps maintain a good electrical connection and prevents voltage drop.
